> ## Documentation Index
> Fetch the complete documentation index at: https://docs.cloud.vessl.ai/llms.txt
> Use this file to discover all available pages before exploring further.

# Admin

> Set up org-wide Storage and invite teammates after initial signup.

<Note>
  This quickstart covers org-wide admin setup. If you haven't created your account yet, start with the [Member quickstart](/guides/get-started/quickstart-user) first.
</Note>

<Info>
  [Admins](/guides/get-started/glossary#admin) manage org-level resources like Storage, Billing, and [Teams](/guides/get-started/glossary#team).
</Info>

<Steps>
  <Step title="Select your organization">
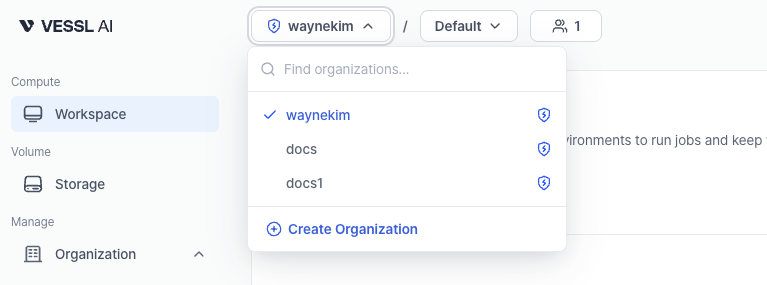
    Log in to [cloud.vessl.ai](https://cloud.vessl.ai). Click your [organization](/guides/get-started/glossary#organization) name in the top navigation bar to open the dropdown, then select the organization you want to manage.

    <div>
      <Frame>
        <img src="https://mintcdn.com/dora/vPFagCAoutrvcxVV/images/neworgselection.png?fit=max&auto=format&n=vPFagCAoutrvcxVV&q=85&s=86dafec9710a5660c1285f456d0d0075" alt="Organization dropdown in the top navigation bar for choosing which organization to manage" width="767" height="285" data-path="images/neworgselection.png" />
      </Frame>
    </div>
  </Step>

  <Step title="Select your team">
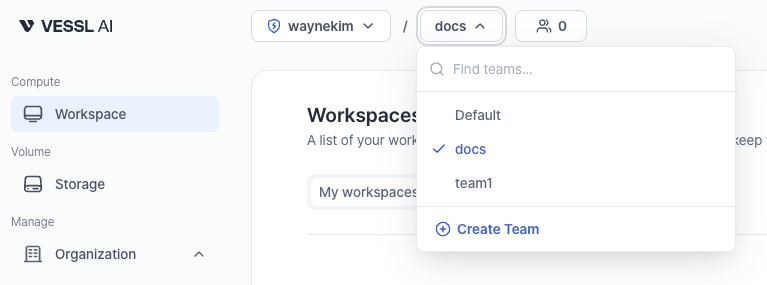
    Next to the organization dropdown, click the team selector to choose which team's resources you want to view. You can switch teams anytime to manage different workspaces and volumes.

    <div>
      <Frame>
        <img src="https://mintcdn.com/dora/vPFagCAoutrvcxVV/images/newteamselection.png?fit=max&auto=format&n=vPFagCAoutrvcxVV&q=85&s=d708abf66bdae008df597aa2dfc9dd8f" alt="Team selector next to the organization dropdown for switching between team resources" width="767" height="285" data-path="images/newteamselection.png" />
      </Frame>
    </div>
  </Step>

  <Step title="View organization storage">
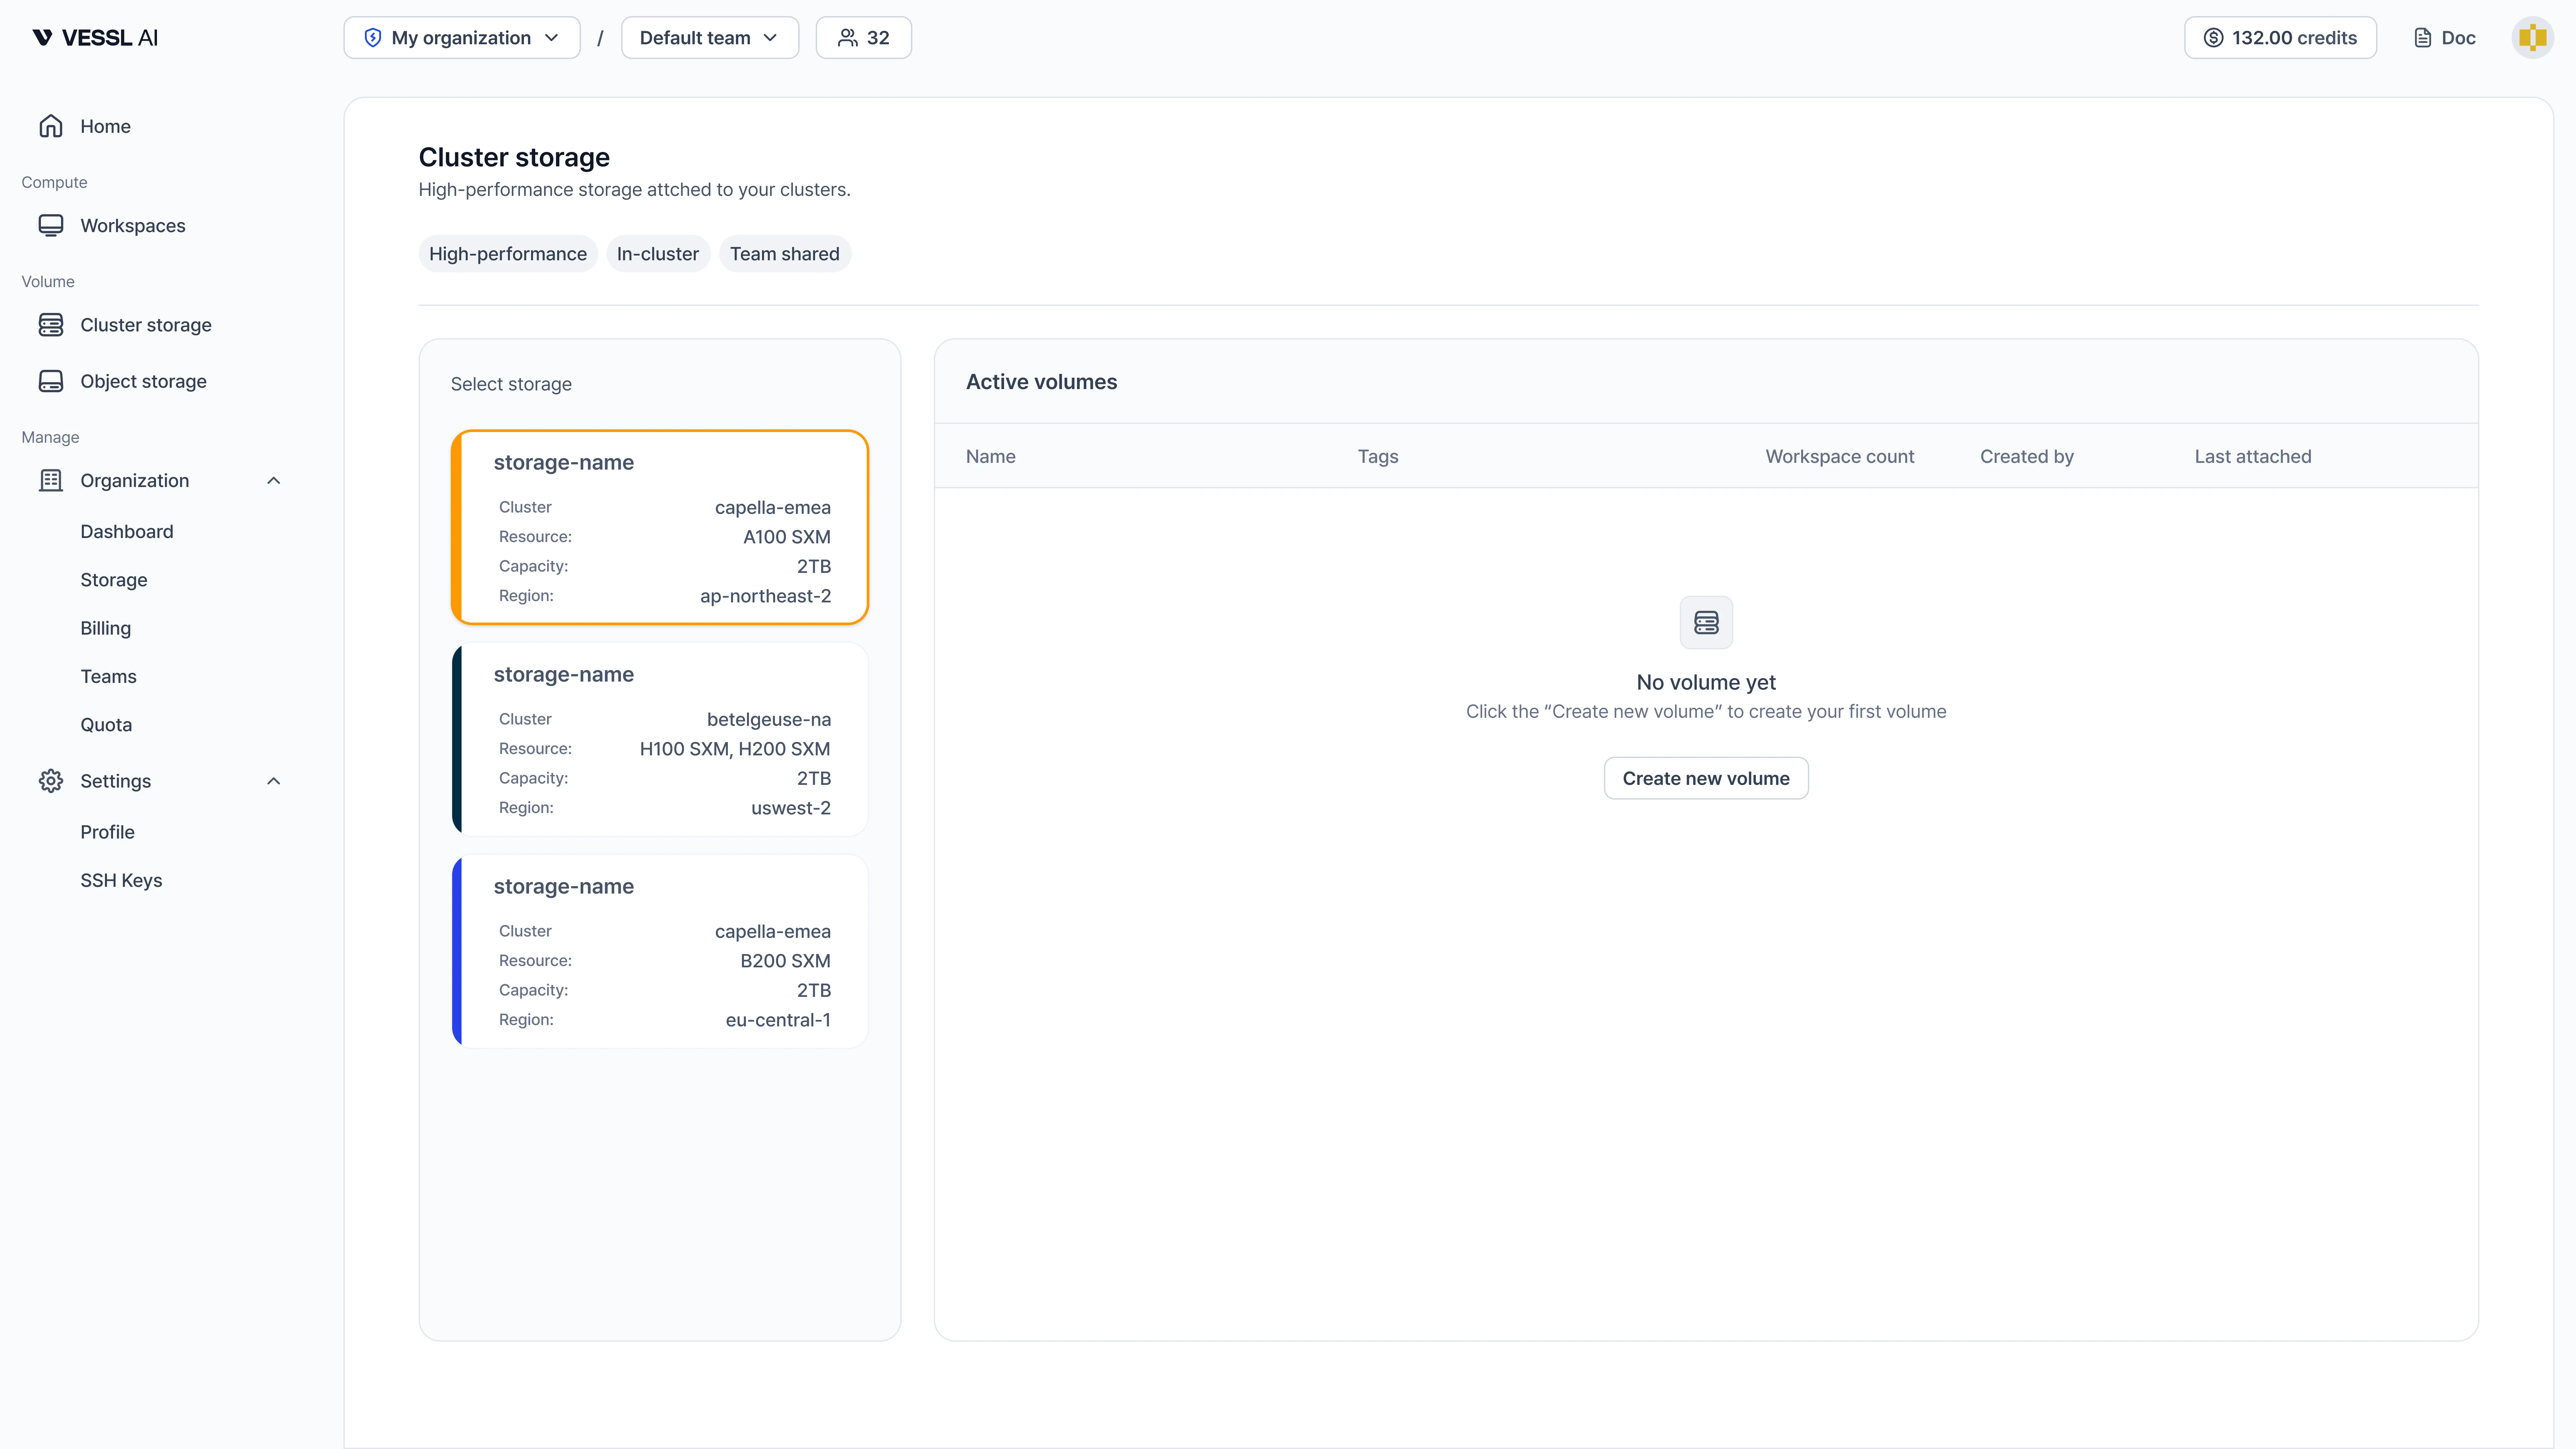
    Navigate to **Manage > Organization > Storage** in the sidebar to see all Cluster storage and Object storage volumes across your organization. You can check each volume's cluster, capacity, and team assignments at a glance.

    <div>
      <Frame>
        <img src="https://mintcdn.com/dora/cE4rOlAFNcAWVENz/images/ClusterStorage_hadstorages_adminside.png?fit=max&auto=format&n=cE4rOlAFNcAWVENz&q=85&s=d4bcaa46687724daf3bac6b9183a0087" alt="Organization storage page listing Cluster storage and Object storage volumes with cluster, capacity, and team assignments" width="7680" height="4320" data-path="images/ClusterStorage_hadstorages_adminside.png" />
      </Frame>
    </div>
  </Step>

  <Step title="Create a new volume">
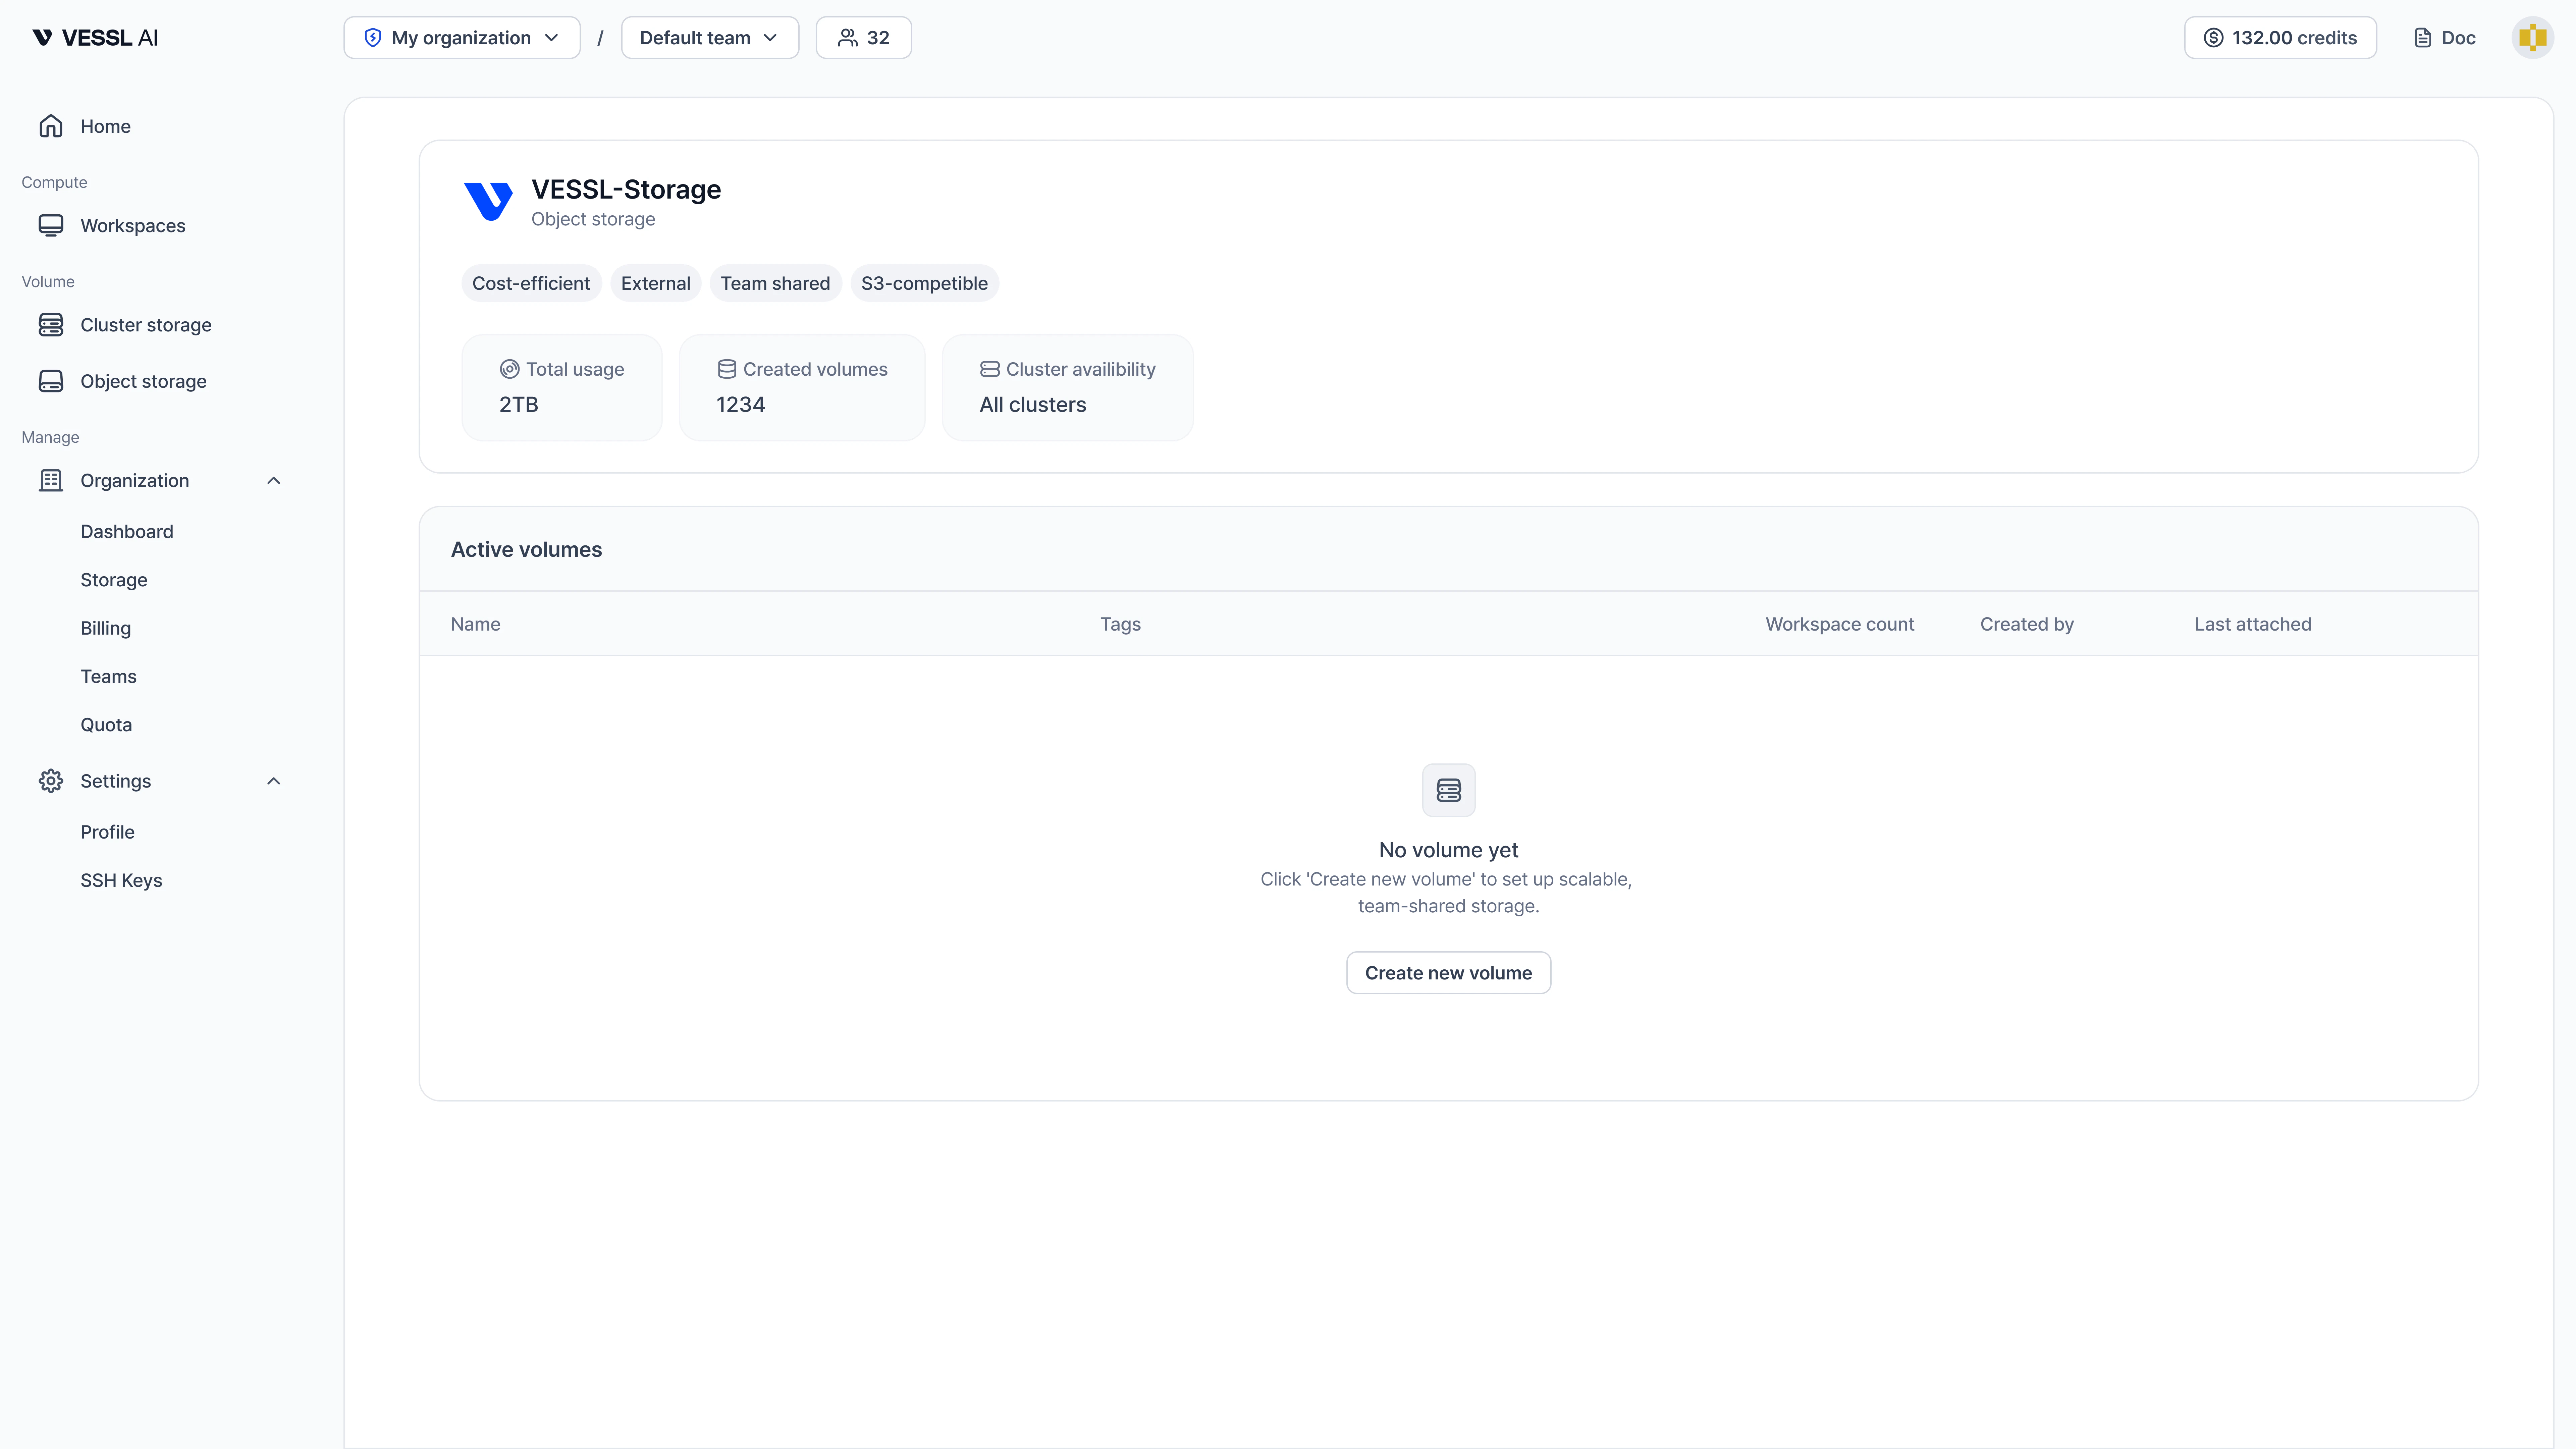
    Click the **Object storage** tab, then click **Create new volume** to create a new [Object storage](/guides/get-started/glossary#object-storage) volume. You can create Cluster storage volumes the same way.

    <div>
      <Frame>
        <img src="https://mintcdn.com/dora/cE4rOlAFNcAWVENz/images/ObjectStorage_emptystate_Adminside.png?fit=max&auto=format&n=cE4rOlAFNcAWVENz&q=85&s=f05a7929e1d15028a6d97a62f12b39a4" alt="Empty-state Object storage tab highlighting the Create new volume button" width="7680" height="4320" data-path="images/ObjectStorage_emptystate_Adminside.png" />
      </Frame>
    </div>
  </Step>

  <Step title="Fill in the form">
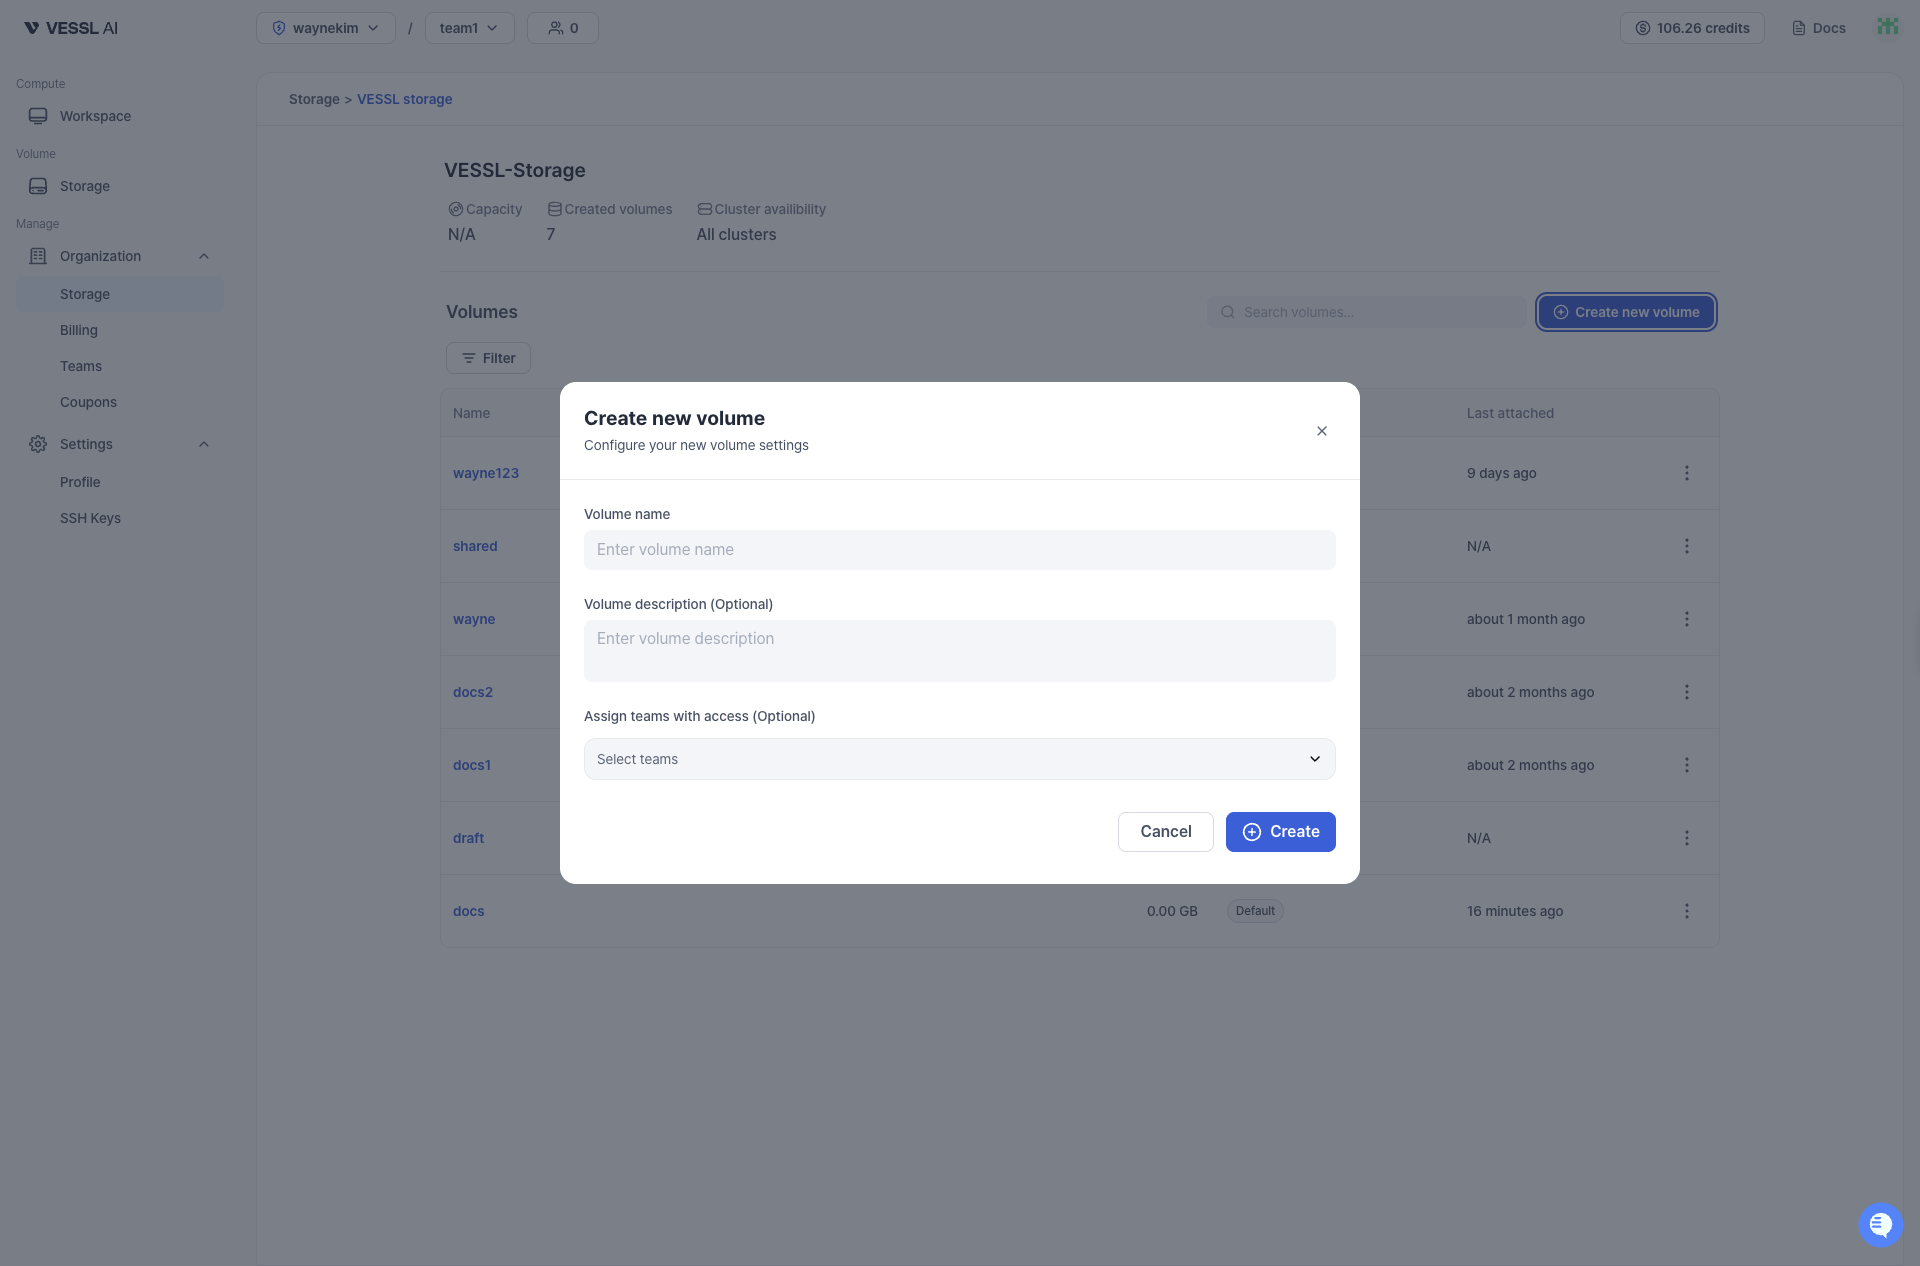
    Enter a <strong>Volume name</strong>, select one or more <strong>teams</strong> to attach, and click <strong>Create</strong> to complete.

    <div>
      <Frame>
        <img src="https://mintcdn.com/dora/gK8h5_hyaHkYrvRc/images/newadmincreatenewvolume.png?fit=max&auto=format&n=gK8h5_hyaHkYrvRc&q=85&s=995860d192dc846259d6550cc7e8ce67" alt="New volume dialog with fields for volume name and attached teams" width="1920" height="1266" data-path="images/newadmincreatenewvolume.png" />
      </Frame>
    </div>

    <Tip>
      You can change team assignments later from the **Volume detail** page.
    </Tip>
  </Step>

  <Step title="Review volume details">
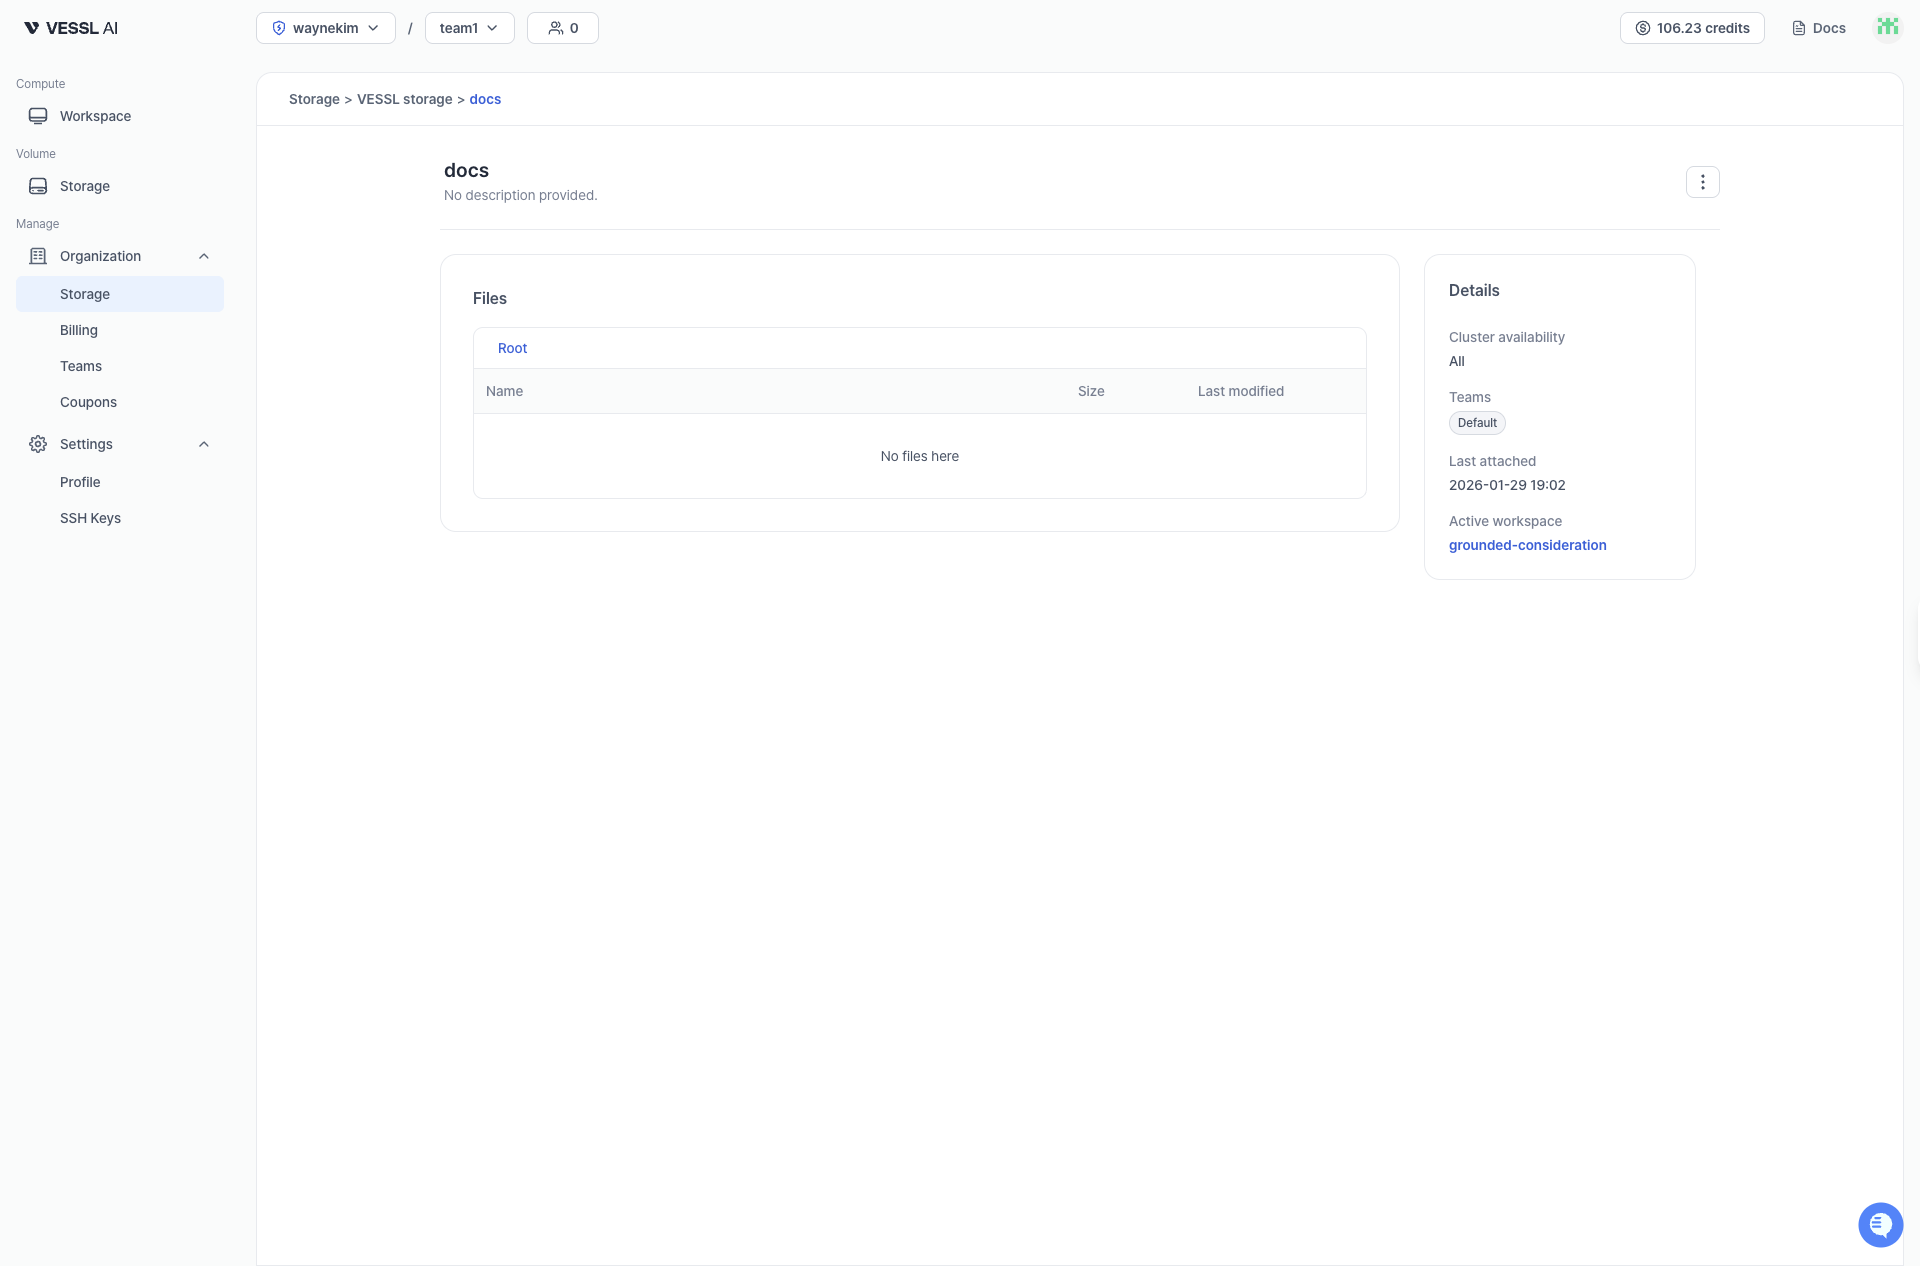
    Review volume details in **Volume detail** (capacity, assignments, created date, and more).

    <div>
      <Frame>
        <img src="https://mintcdn.com/dora/gK8h5_hyaHkYrvRc/images/newadminvolumedetail.png?fit=max&auto=format&n=gK8h5_hyaHkYrvRc&q=85&s=c8d9619dff65572c3818f3213f965dec" alt="Volume detail page showing capacity, team assignments, and created date" width="1920" height="1266" data-path="images/newadminvolumedetail.png" />
      </Frame>
    </div>
  </Step>

  <Step title="Invite teammates">
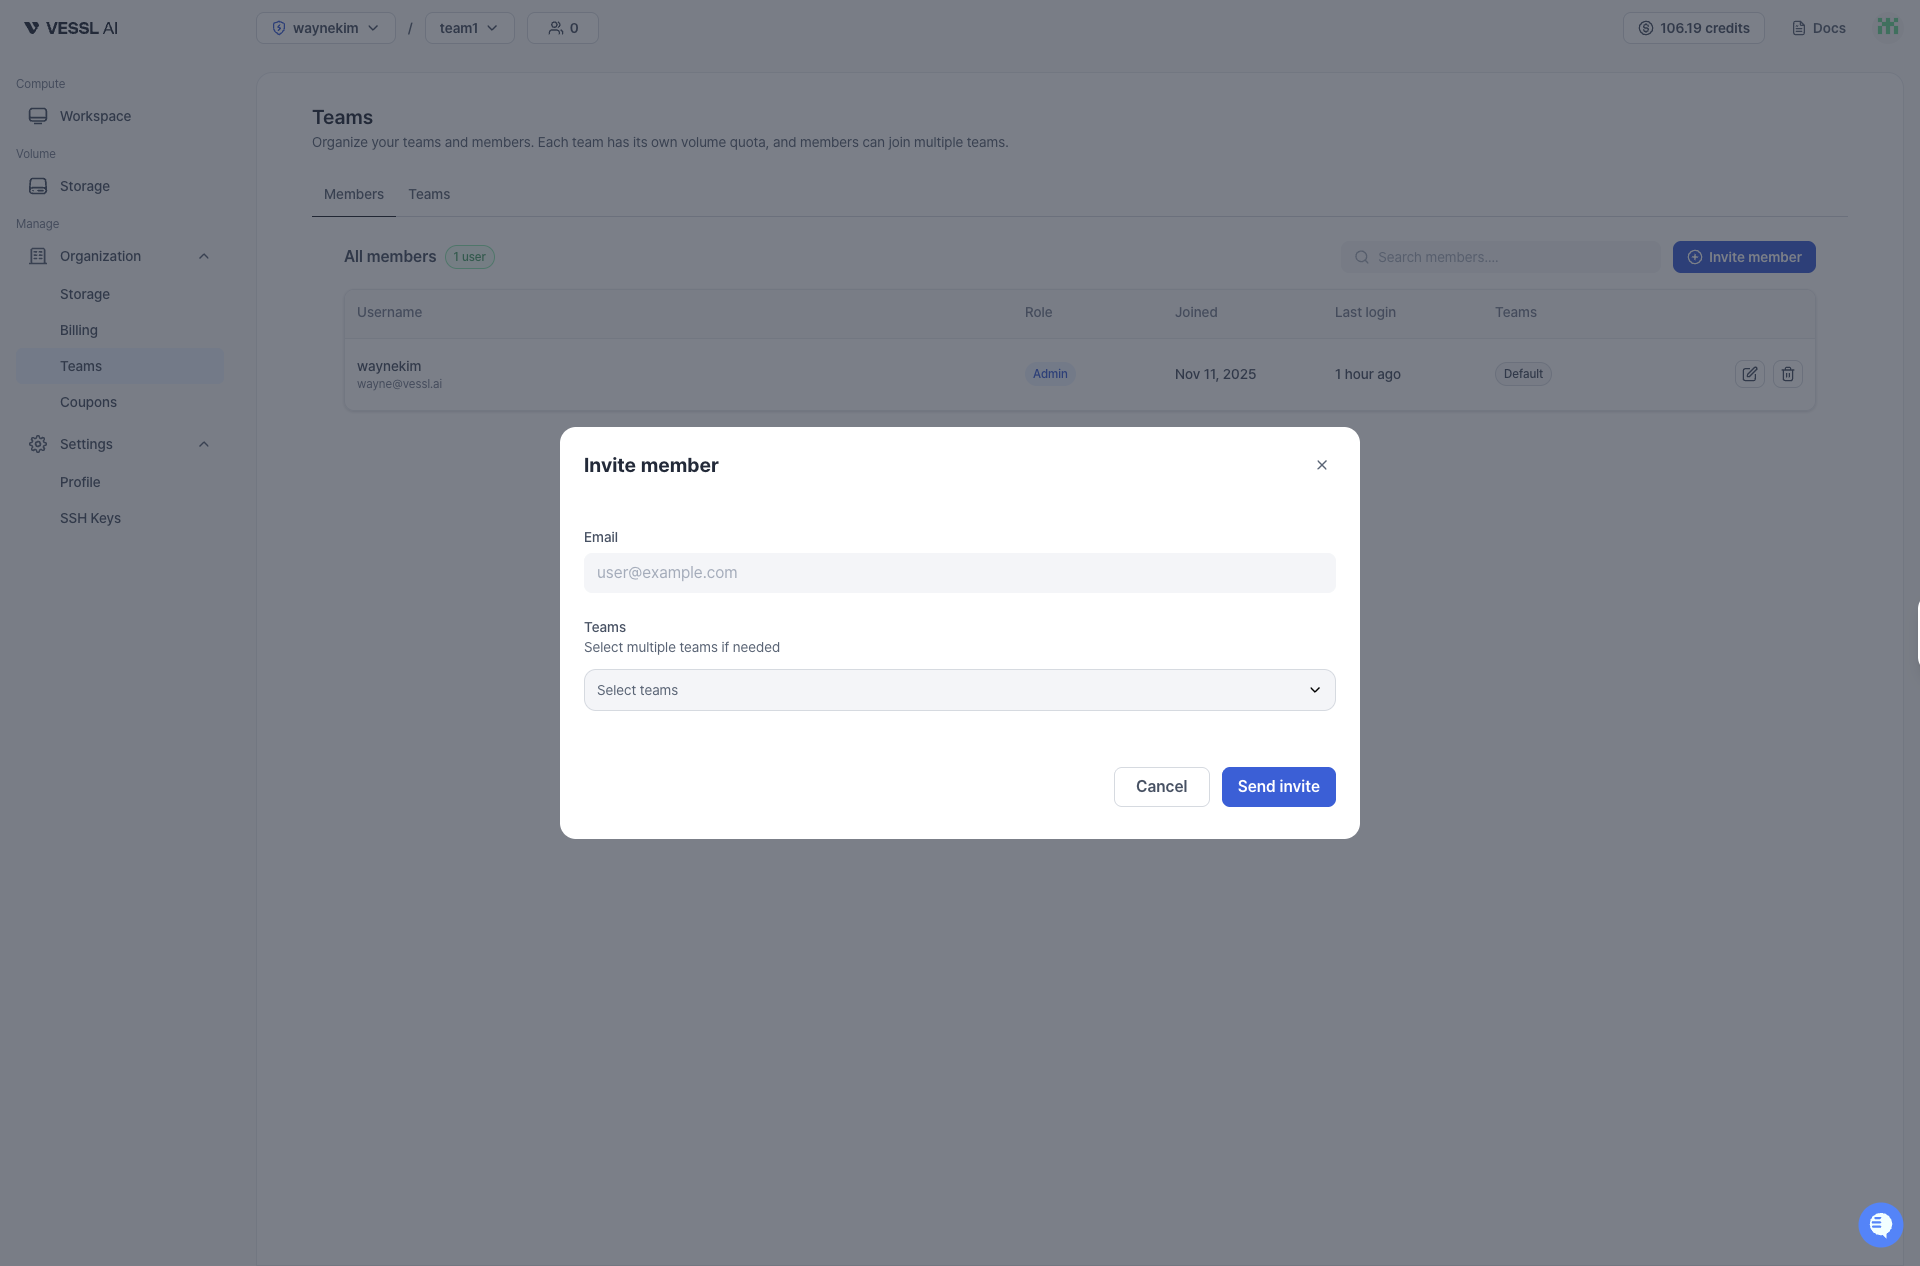
    Invite by email. Invited users are in Invited state until they verify their email, then become Active. You must assign at least one Team when inviting. A [member](/guides/get-started/glossary#member) can belong to multiple Teams.
    <div>
      <Frame>
        <img src="https://mintcdn.com/dora/vPFagCAoutrvcxVV/images/newinvitemembers.png?fit=max&auto=format&n=vPFagCAoutrvcxVV&q=85&s=f422a51863b47673a5be09a455a96bf7" alt="Invite members form for adding teammates by email and assigning them to teams" width="1920" height="1266" data-path="images/newinvitemembers.png" />
      </Frame>
    </div>
  </Step>
</Steps>